
Come learn to make a picket bench. This straightforward construct requires simply two boards (2x8x8′) and takes lower than an hour!
Extra to construct utilizing structural lumber: Find out how to construct space-saving benches for a small deck – Find out how to construct a hexagon planter – Find out how to construct a backyard arbor/marriage ceremony arch
Find out how to Make a Picket Bench
from simply Two Boards
By Crystal at The Weathered Fox
I really like an excellent structural lumber tutorial as a result of the fabric is usually cheap and straightforward to search out.
The grey, distressed paint, the tough wooden, and the cathedral type/gothic arch legs on this bench make it the right for a marriage or so as to add to any backyard or porch!
See extra DIY concepts for an out of doors marriage ceremony.
So, let me present you methods to make a picket bench for your self!
This submit incorporates affiliate hyperlinks. Learn our full disclosure right here.
Supplies wanted
Minimize Checklist
- 4 – 2x8x18″ – reduce two from every board (Sure, that’s it!)
Step 1: Minimize
Minimize two 18-inch items from every board (4 whole 18-inch boards for the legs). The remaining boards would be the seat. These cuts are simply made with a miter noticed or round noticed. Or, make it even simpler and have the ironmongery shop reduce the boards for you.

Step 2: Create a Sample for Leg Openings
Create a sample so each legs will match. Utilizing a scrap of cardboard, draw one half of the opening you need on the legs.
To match mine, draw a half arch that’s about 13 inches at its peak and about 5 inches large on the base.

Hint the sample onto every leg.

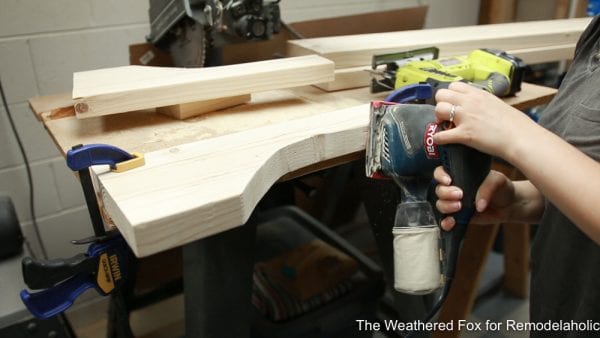
Step 3: Minimize the Leg Openings
Utilizing a jigsaw, rigorously reduce alongside your marked path.

You possibly can sand out any imperfections now or wait till after the bench is assembled.
Step 4: Assemble Every Leg
Lay the leg items out as they’ll be on the completed bench.
a. Add 4 pocket holes to at least one piece of every leg utilizing a Kreg Jig or different pocket gap system, as proven under (and in accordance with product directions).


(It might have been overkill so as to add as many as we did, however we needed it to be sturdy!)

b. Add a line of building adhesive the place the 2 leg items will likely be joined.

c. Clamp the 2 leg components collectively.

d. Wipe any extra adhesive from the joints. 
e. Drive the Kreg screws by way of the pocket holes.

Repeat the steps to create the opposite leg. (The identical steps will likely be repeated to create the seat and fasten the legs to the seat: drill pocket holes, apply adhesive, clamp, insert screws)
Step 5: Create the Seat
Examine the lengthy boards and select which surfaces will likely be greatest for the highest of the seat.
Flip the boards over and drill pocket holes 6 inches aside alongside the size of 1 the boards.

Apply adhesive, clamp the boards collectively, then put within the screws. 
Step 6: Connect the Legs to the Seat
Measure and mark 7 inches from the top on the underside of the seat on each the left and proper sides.
Then, with the pocket holes dealing with to the within, connect your legs utilizing the identical course of: create pocket holes, add adhesive, clamp into place…

…and be part of with screws. 
Step 7: Sand and Wait
Sand the whole bench to your liking. Look ahead to the adhesive to dry earlier than transferring on to the end. 
Planning to color your bench a lightweight shade? Don’t let the knot holes bleed by way of! See Find out how to Completely Cowl Knot Holes
Step 8: Select your end!
For our bench, I went with a chalk type paint in a lightweight grey.
I painted one coat, various the thickness of the coat to create a distressed end. In some areas I painted on an opaque coat, in different areas I used a drybrush approach to very calmly apply the paint simply to the excessive areas of the wooden.

As soon as the paint was dry, I rubbed in a little bit of a weathered wooden stain everywhere in the floor. This pulled out the grain of the wooden, but in addition gave a little bit of age to the colour of the paint.
For this system, you don’t need to have an excessive amount of stain in your paper towel, slightly goes a good distance! And rub it in kind of such as you would a wax. You don’t need any further stain left over on the floor.

Extra end concepts: 5 Methods to Paint Wooden Furnishings – Find out how to Coloration Wash Unfinished Wooden –
Find out how to obtain Restoration {Hardware} weathered oak end
Step 9: Apply Sealer
As soon as your stain has dried, apply an out of doors sealer to the bench when you’re utilizing it outside. If you happen to intend to make use of it inside, a water-based poly will just do high quality.
Two to 3 coats of the out of doors sealer will be certain that your bench lasts for years. Permit the sealer to dry fully and also you’re finished!

I really like having my bench in my backyard!

It makes for an inspiring place to take a seat, have a cup of espresso, and hearken to the birds chirping. I feel this simple picket bench matches proper in!

If you happen to love this simple farmhouse bench, I’d love so that you can head over to my weblog, The Weathered Fox, for extra, resembling my farmhouse toilet transform and my thrifted candlestick makeover!
Extra from Crystal: methods to construct a straightforward rustic wall rack and methods to flip a thrifted chandelier right into a farmhouse-style chandelier with just a few paint!
Extra Benches to Construct:
Please pin this!
 Initially revealed 07.05.2017 // Up to date 04.21.2021